Get organized, pack smart with Packing List 2. Your travel essential.
Introducing Packing List 2, the revamped edition of the Packing List. Just
like the original Packing List, you can easily create and customize packing
lists for any trip, whether you're heading to the beach, hitting the slopes,
or jetting off on a business trip.
With a simple and intuitive
interface, Packing List 2 allows you to quickly add and remove items from your
list, and easily organize them into categories such as clothing, toiletries,
and electronics. You can also create multiple lists for different types of
trips, and save them for future use.
But that's not all! Packing List 2
also offers helpful features such as group items by luggage or locations, and
the ability to share your lists with friends and family. And with automatic
syncing across all your devices, you can access your packing lists anytime,
anywhere.
Whether you're a frequent flyer or a first-time traveler,
Packing List 2 is the perfect tool to help you stay organized and stress-free.
Features:
• Pre-loaded master templates
• Create new list from scratch or generate from
templates or existing one
• Support Multiple lists
• Mass change for easy editing
• Group by luggage/locations for easy packing
• Data are automatically synced to the cloud so it
can be accessed from multiple devices
• Share lists
between users
Notes for the old Packing List -
full app users:
You will need to register a new account in Packing List
2. If you have the original "Packing List - full" installed on your current
device, the Ads in this app will be automatically removed after account
registration. You can also migrate your lists from the old app to the new app.
Please see “Backup and Restore” section below for more detail.
Quick links:
Login/Sign up
Creating New List
Add New Item
Import Items
Edit Items
Options on category
Manual Reorder Categories and Items(v1.2.1+)
Assign Luggage
Group By Luggage
Group By Location
Edit Metadata
Mass Change
Export Lists
Share Lists with others
Backup and Restore(Migration)
Offline mode
Where to find our apps
Login/Sign up
To login/Sign up, click “LOGIN/SIGN UP” button the top right of the home screen. You can sign in with Google/Apple or sign up using email/password.


Creating New List
To create a new list, click the + icon on top right of the Home screen.

It will open the list editor and prompt you to enter name, notes, departure/return dates, destinations and flight information. You can also change the list status to be “Active” or not. In the home screen, you can then choose to display active lists only.

To see the options for a list, swipe the list name to the left. There are options for editing the list header, checking the flight information or weather, changing the list status, deleting the list or sharing the list. We will explain the list sharing feature later in this guide.

Add New Item
Once created, your list will open automatically. To add items, tap the floating “+” icon at the bottom, or select “New Item” from the three-dot menu. Alternatively, tap the “+” icon next to any category name to add an item directly to it.


"Name" and "Category" are required fields. You can select a category from the drop down or add a new one by clicking on the “+” icon on the right.
To add multiple items at once to a category, click on ![]() icon on the right of the category name and enter the items in the popup
dialog.
icon on the right of the category name and enter the items in the popup
dialog.

Import Items
To import items from preloaded templates or your own lists, open your current list and tap the three-dot icon in the top right. Select Import/Export, then choose either 'Import from templates' or 'Import from my other lists.' From the import view, select your source, pick the items you want, and tap the Save icon in the top right corner.


You can also import all items from multiple lists. Click on the ![]() icon in the “Import from my other lists” view and select the lists you
want to import.
icon in the “Import from my other lists” view and select the lists you
want to import.
Edit Items
To edit an existing item, swipe the item name to the left and right. There are options to edit the item, change the quantity of the item, mark the item active/inactive, mark/unmark the item as important and delete the item.


We’ve added a shortcut to sync items from any list to your Master Lists.
Setup: In the Account view, toggle on "Auto Update Master Lists" and select your preferred default lists.
How it works: When you click the
icon in the sliding menu of an item, the current item is automatically added to those selected lists.
Automatic Renaming: If you rename an item, the app will now search for it within your selected master lists and update the name there as well.
New in 1.3.7
Smart Deletion: When deleting an item while master lists are active, the app will now ask if you would like to remove the item from your master lists as well.
Copy & Paste: 1. Slide an item to the left and tap the Copy icon. 2. To paste into a category, tap the three-dot icon to the right of the category name and select "Paste Item" from the menu.
Options on a category
To check/uncheck all items under a category, rename the category or reorder items, click on the 3-dot icon on the right of the category name and select the option from the popup menu.

Manual Reorder Categories and Items(v1.2.1+)
To reorder categories, go to the “Metadata” view. Select “Category” in the
“Metadata Type” drop down. Then click on the ![]() icon on the top right corner. It will enter the reordering view. Press
on the reorder icon. Then drag and drop the category to desired location. When
you are done, click on “Save” to save your changes.
icon on the top right corner. It will enter the reordering view. Press
on the reorder icon. Then drag and drop the category to desired location. When
you are done, click on “Save” to save your changes.


To reorder items within a category, tap the three-dot menu for that category and select “Sort Manually.” In the reordering view, use the reorder icon (≡) to drag and drop items into your preferred order. When finished, tap “Save” to apply your changes.


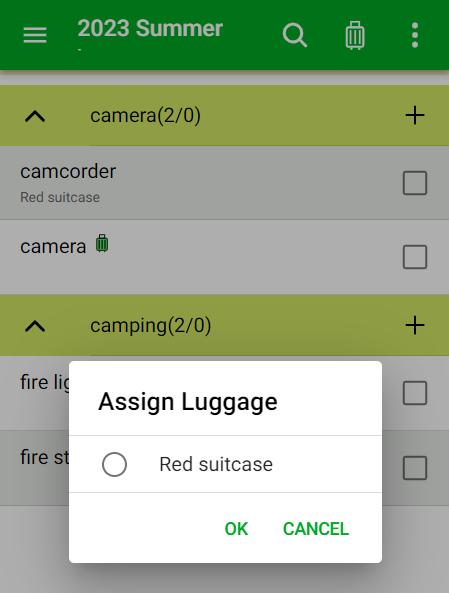
Assign Luggage
A new feature in this version allows for nested luggage, enabling you to add bags within other bags. You can maintain a Master List of all your luggage (see the “Edit Metadata” section), and then assign specific pieces to each individual packing list.
Managing Luggage
To assign luggage to a list, tap the three-dot menu icon and select “Edit Luggage”. From this view, you can:
Add a piece of luggage from your Master List.
Rename, delete, or swap luggage.
Nest luggage: Create a hierarchy by dragging and dropping one piece onto another to set a new "parent" bag.
Assigning Items to Luggage
Once luggage is assigned to a list, a green luggage icon will appear next to your items. Simply tap the icon to assign that specific item to a bag.


Group by Luggage
Items can be grouped by luggage. To open this view, tap the ![]() icon in the top right. Any items without an assigned bag will appear at the bottom under “No Luggage Assigned.”
icon in the top right. Any items without an assigned bag will appear at the bottom under “No Luggage Assigned.”
Weight Tracking:
Auto-Calculation: If your items have weights assigned, the total weight for each piece of luggage will be calculated as you check items off.
Luggage Weight: If the luggage itself has a weight, it will be included in the total weight calculation automatically.

Group by Location
Items can also be grouped by location. To enable this, tap the three-dot menu icon and select “Group by Location.” Any items without an assigned location will be grouped together at the bottom of the list. To assign a location, simply tap an item and select the desired location from the menu.

Edit Metadata
To edit metadata such as the categories, luggage and locations, click on
the icon on the top left To edit categories, luggage, or locations, tap the ![]() icon in the top left and select “Metadata.” From there, choose the metadata type from the dropdown menu to begin editing.
icon in the top left and select “Metadata.” From there, choose the metadata type from the dropdown menu to begin editing.
Note: If you delete a metadata entry, that value will be cleared from all associated items across your lists.
New in v1.0.4 You can now assign a weight to a piece of luggage. This weight will be automatically included in the total weight calculation when using the Group by Luggage view.


Mass Change
To make changes to multiple items at once, tap the three-dot menu icon and select “Mass Change.” This will display a list of editable items. Select the items you wish to modify, then tap the
icon in the top right to enter new values. You can also delete multiple items by selecting them and tapping the trash bin icon.


You also have the option to add items as well as move them to different categories.
Export List
To export the items in a list, tap the three-dot menu icon and select “Import/Export” → “Export List.” You can then choose to send the items via text or email, or save them in plain text format using your preferred apps.

Share Lists Between Users
To share a list with another user, swipe the list name to the left and click
on the ![]() icon.
icon.

Then click on the “+” icon on the top right to enter the email address of another registered user.


An invitation will be sent to the recipient, who will receive a notification on the “Account” tab in their app. They can then choose to accept or decline the invitation. Once accepted, your list will appear under their login. You can stop sharing a list at any time by deleting the user from the “Share List With” view.
Backup and Restore(or Migration)
Backup & Restore
To backup or restore your lists, tap the ![]() icon in the top left and select “Backup & Restore.” This will save your lists to your browser's local storage or your device's storage. On Android or iOS, your data is saved to the “Documents” folder within your Internal Storage.
icon in the top left and select “Backup & Restore.” This will save your lists to your browser's local storage or your device's storage. On Android or iOS, your data is saved to the “Documents” folder within your Internal Storage.
Migrating from Older Versions (Android) If you have the previous Packing List app (Lite or Full version) installed on your Android device, the new app will display a “Migrate From Packing List” button. Use this to easily transfer your existing lists to the new app.
Here is a video tutorial on how to migrate your lists.


For Android 10 and below, the app will try to navigate to the list folder the Packing List(lite or full) is using. You should see the following screen after clicking on “Migrate From Packing List” button. You can then click on the list you want to migrate and click on “Select” button on the top right to select the list.

For Android 11 and above, you will have to first use the “Backup and Restore” feature in the old Packing List app to backup your lists to a folder which can be accessed by the new Packing List 2 app. It is recommended to save your lists to the “Documents” or “Download” folder. When you click on the “Migrate From Packing List” button, it will open the file picker which should look like the screenshot below. You can then navigate to the folder containing the backup and select the list file you want to migrate.

After selecting the file, you will be prompted to check the content and then click on the “Confirm” button to complete the migration.

You can also select multiple files and migrate them at once.
Sometimes if you don’t see your lists after the migration, you might need to kill and restart the app.
Account View
To edit user preferences, sign out or delete the account, click on
the ![]() icon on the top left and then select “Account” from the menu. In
the preferences section, you can enable dark theme, switch the weight unit and
etc.
icon on the top left and then select “Account” from the menu. In
the preferences section, you can enable dark theme, switch the weight unit and
etc.
Please note, if you want to delete your account, you may be prompted to sign out and sign in again to refresh the credential.

New in v1.3.7,
You can now customize the toolbar icons for quick access and change the app colors.


Offline Mode
In version 1.1.0 and above, the app allows usage without an internet connection, with certain limitations. Any modifications made are saved locally and synchronized once the device regains online connectivity.
Where To Find the Apps
Web Site:
Google Play Store:
https://play.google.com/store/apps/details?id=com.dotnetideas.packinglist2
Apple App Store:
https://apps.apple.com/us/app/packing-list-2/id1671080832
Contact Us
Please feel free to contact us at dotnetideas@gmail.com if you have any questions or feedback. Thank you!